Best Practices for Naming Sequences
I began hunting for a systematic way to organize sequences soon after I began teaching in the documentary program at UC Berkeley. I noticed that many students were labeling their sequences “final”. The problem with that nomenclature is that there was inevitably one more or more “final final”, creating havoc when I attempted to grade or the class tried to assemble a show. One student labeled his sequences “Final Uno”, “Final Duo,” “Final Tres, etc” to help me out.
Then, during a tour of Current TV’s production studios in San Francisco, I encountered a brilliant method for naming sequences and projects that I have since adopted and would like to pass on. Current TV’s post-production supervisor needed a way to keep track of multiple versions of Final Cut Pro projects and sequences that passed his desk. He showed us his simple, brilliant method. Warning: this method involves putting the date first, in a way that you are probably not used to. It’s not the American style, it’s not the European style, it’s a logical style!
Six-Digit Dates
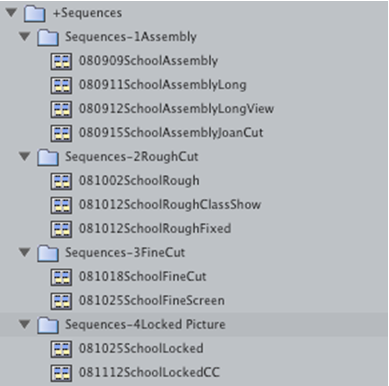
Let’s start with Sequence bins. I label my Sequences bin with a “+” prefix (“+Sequences”) so I will not have to hunt for this frequently used bin. It always appears at the top of my Browser. Within the +Sequences bin, I recommend creating at least four sub bins for the four stages of post-production: 1Assembly, 2RoughCut, 3FineCut, 4LockedPicture. (More on this later.)
Now here’s the nut: within these sub bins, sequences are labeled with a six-digit date (year, month and day) and then a short description. For example, a rough cut sequence about the Bay Bridge created on November 3, 2009, would be labeled “091103RoughBridge”. While adopting this unfamiliar order of placing the year first, then the month, then the day may feel awkward at first, the payoff is that your sequences will always appear in chronological order, no matter what descriptive name you give them. Besides, you’ll quickly get the hang of it!
In the example below, not only are the sub bins chronological (because their names start with a number), but the sequences within them flow in order of earliest cut to most recently cut.
Conversely, in the screenshot below, the date appears at the end of the name, thereby undermining the ability to list sequences chronologically. This method leads to hunting, confusion and lost time.
Here’s one additional tip from San Francisco director/editor Ken Schneider (Speaking in Tongues, 2009) that I’ve also begun adopting. Create a “Selects” bin for your earliest sequences containing favorite shots or sound bites. If you choose to use this method, then you would create five sub bins of your +Sequences bin:
- Sequences – 1 Selects
- Sequences – 2 Assembly
- Sequences – 3 RoughCut
- Sequences – 4 FineCut
- Sequences – 5 LockedPicture
Schneider says the benefit of creating “selects” sequences is handy access to valuable footage. “First impressions are very important to me,” says Schneider, “and selects reels (sequences) include shots that made positive first impressions on me.” He recommends going to back to reflect on one’s selects sequences after cutting a rough cut.
Next month I’ll show you how to organize your editing process into discreet stages that will save you time and money in post-production.
